
 Print
Print
|
|
|
DC Power Supply Installation
Note: Harris Broadcast recommends the use of 35A breakers in the DC power source for each Selenio frame. Only qualified technicians should install Selenio DC power supplies. See Tyco application specification 114-6051 for additional details on hand crimping recommendations, including strip length and dies for other gauges of wire.
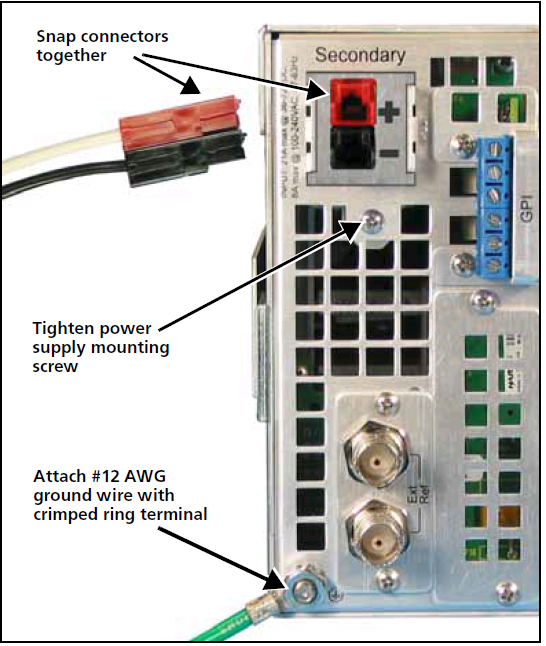
To install a DC power supply (SELOPT-PSU-DC), follow these steps:
- Open the front of the frame and then slide the DC power supply unit into its slot.
- At the rear of the frame, secure the power supply by inserting and tightening the mounting screw.
- Use a crimp tool to attach your #12 AWG DC supply wires to the red and black crimp connectors (crimp connectors are supplied with the Selenio frame).
Recommended hand crimping tool is Amp 69710-1, used with Amp crimping die 58490-1 for 12 AWG gauge wire.
- Crimp a ring terminal (for a #10 size screw) to your #12 AWG ground wire.
Recommended ring terminal is Panduit P10-10R-L, with Panduit CT-1570 crimping tool. See the Panduit PA22153A05 Operation Instructions for details.
- Secure the ground wire under the ground lug nut located at the bottom left corner of the frame (see below)
- Snap the DC conductors into the same-colored mating connectors inside the power supply.
- At the front of the frame, turn the power supply on, and then close the front panel to ensure proper cooling of the frame.
DC Power Supply Rear View

WARNING
For personal safety, frames using DC power supplies MUST be grounded using the external ground lug located on the back of the frame. Do not install a DC power supply in a frame using an AC power supply.
- Gently press the submodule down onto the controller module, and then, from underneath the controller module, insert and gently tighten the four screws to attach the submodule.
- Reinsert the controller module, turn on the power, then close the front panel.
|
© 2018 Imagine Communications Corp. Proprietary and Confidential |
Return to Top |